ASP.NET MVC has significantly matured over the past few years, emerging as one of the premier web frameworks for developing secure, fast, enterprise-level web applications. The Microsoft team continually works on enhancing the product, ensuring that updates pushed to the framework are thoroughly tested and reliable. This has positioned ASP.NET MVC as a strong contender for the framework of choice in web development. Coupled with the elegance and power of C#, it’s undeniable that developing in ASP.NET MVC is a pleasure for developers. However, before delving into ASP.NET MVC, or any MVC framework for that matter, developers must adopt a specific mindset. ASP.NET MVC, like other popular MVC frameworks such as Ruby On Rails or Spring MVC, follows a convention-over-configuration approach. But what does convention over configuration entail? Simply put, a convention represents an established way of doing something, such as naming a class. So, how does adhering to conventions improve over configuration? By adhering to established conventions, developers can significantly reduce the amount of boilerplate work. In today’s world where extreme programming and agile development are the norm, every competent developer seeks to minimize mundane tasks as much as possible. With this in mind, we will embark on our ASP.NET MVC step-by-step tutorial. Additionally, I’d like to mention that the full source code for the project is available on GitHub as a public repository and can be accessed through the link provided below.
Download Complete Source Here
- What are we building
- Approach
- Tools
- Steps
What are we building
We are in the process of developing a straightforward e-commerce application, equipped with most of the features commonly found in modern e-commerce websites. These include a catalog, product categories, a shopping cart, a checkout mechanism, and a user authentication module. For Java developers, the Netbeans documentation includes an e-commerce tutorial named AffableBean, accessible here. This tutorial utilizes older Java EE technologies to construct the e-commerce website. Similarly, a developer has replicated this tutorial using SpringMVC, with details available here. Now, we are replicating the same application, but with additional features, to demonstrate the ASP.NET MVC development perspective. This endeavor also aims to enable developers to discern the differences between the technology stacks.
Our approach
ASP.net MVC now recommends a Code-First Approach to application development. And it is highly recommended to utilize the ORM (Object Relational Mapper) called Entity Framework to be used as it is developed and maintained by core ASP.net team although there are other ORM choices like NHibernate etc. So what is code-first approach? In code first approach we define our domain objects(entities) as POCO classes. A POCO(Plain Old Clr Objects) is nothing but a simple c# class. For example have a look at the below Product class
public class Product
{
  public int Id { get; set; }

  [Required(ErrorMessage = "Product name is required")]
  [MaxLength(45, ErrorMessage = "The maximum length must be upto 45 characters only")]
  public string Name { get; set; }

  [RegularExpression(@"^\d+.\d{0,2}$", ErrorMessage = "Has to be decimal with two decimal points")]
  [Range(0,5,ErrorMessage = "The maximum possible value should be upto 5 digits")]
  public Decimal Price { get;set; }

  public string Description { get; set; }

  [Display(Name = "Updated At")]
  [Column(TypeName = "datetime2")]
  public DateTime LastUpdated { get; set; }

  public int CategoryId { get; set; }

  public virtual Category Category { get; set; }

  public virtual ICollection<OrderedProduct> OrderedProducts { get; set; }
}
As you can see it is a simple c# class with few Annotations. Those annotations make Entity Framework to generate validation rules or create a display name attribute while generating scaffolding code for us. With this class and a Data context that inherits from DbContext is more than enough to create the database table for us by Entity framework. Lets look at the datacontext class below
public class MvcAffableBeanContext:DbContext
{
  public MvcAffableBeanContext() : base("MvcAffableBean")
  {

  }
  public DbSet<Product> Products { get; set; }
}
Again here we are basically doing nothing the whole work is being done by the DbContext class defined under System.Data.Entity namespace which is part of Entity Framework. Many people ask how to target a database name of their choice while using entity framework, as it turns out it is very simple and I will explain the trick here. Have a look at the Constructor function
MvcAffableBeanContext() : base("MvcAffableBean"){}
We are basically using the base keyword to use the constructor with the connection name overload which is defined in the DbContext class. Apart from this we also need the Web.config to have an entry as follows:
<connectionStrings>
  <add name="MvcAffableBean" providerName="System.Data.SqlClient" connectionString="Data Source=.\sqlexpress;Initial Catalog=MvcAffableBean;Integrated Security=True;" />
</connectionStrings>
This shows how smart Entity Framework is, it will take the Id property of the class and create an Auto-increment id table in the database which will be primary key, if we named it differently instead of Id or ProductId then we have to annotate it with [Key] annotation to make Entity Framework know, we want that field to be the primary key. Another interesting thing to learn is Navigation properties and virtual keyword. Navigation properties are essentially relationships. For example looking at the following line of code in the product class
public virtual Category Category { get; set; }
and
public int CategoryId { get; set; }
tells us that Category Id is a foreign key in product table and looking at the Category.cs file we will find this line
public virtual ICollection<Product> Products { get; set; }
Reading both in conjunction we can easily know that Every product belongs to one Category and a category can have many products hence the
Icollection<Product>
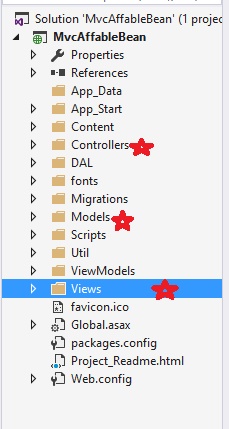
So this demonstrates how easy it is to create relationships and we can access relational data from the other table in our code using navigation properties and .(notation) just like accessing data of objects. Once you download the source code from GitHub have a look at all the classes inside Models folder which by convention stores all our domain objects. The virtual keyword provides lazy loading i.e. do not load all items into memory until it is needed. Have a look at the conventional folder structure of asp.net MVC
The folder structure:
Tools used
- Visual Studio 2013+
- Entity Framework 6.1.3
- Bootstrap
- SQL Server 2008+
- jQuery
- Newtonsoft JSON
Look at the end result of the product we are developing:


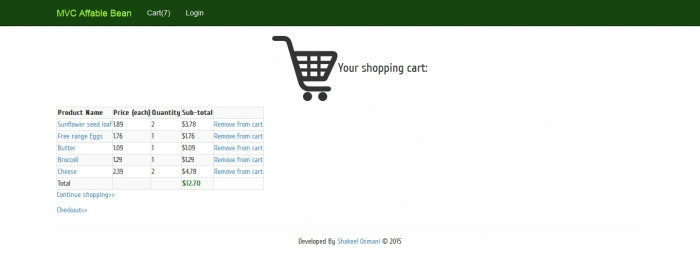
The above were a few selected screens, I encourage you to download the project from GitHub and run it on your system to get complete feel of the project and also to follow along
Setps
- Create an empty ASP.net MVC project choose no authentication we will manually build authentication by copying and pasting from scaffolding code from another individual account project and modify it
- In the Models folder add all the domain classes as found in the GitHub Models directory and build the project once
- Add Controllers one by one scaffolding from the Model and with Entity Framework
- Add Views via right clicking on the controller action from the scaffold
- Create the shopping cart view models as defined in the ViewModels folder from the GitHub project
- We create them as view models as we do not want to persist the data of such complex business tier where complex business logic calculations are happening
- Populate the required partial views for the Cart and Logon section on the navbar
- Create the checkout controller
- Copy the Accounts controller from the GitHub project
- Add the footer JavaScript on the _Layout file
- Import the images and keep the folder structure same
- Run the project
Programming like swimming can only be learned if you dive into it. I hope you will download the project and fiddle with it or create the code of your own and may be enhance the project too. Do hit me up with comments if you want to improve something or if you did not like something. Happy coding 😄
Update
Those who are facing foreign key constraint errors, please follow the below steps, should be fine:
Delete the migrations folder completely and add new migrations, that will solve all the issues:
Steps:
- Delete the state: Delete the migrations folder in your project Delete the __MigrationHistory table in your database (may be under system tables);
- Run the following command in the Package Manager Console:
Enable-Migrations -EnableAutomaticMigrations -Force- Use with or without
-EnableAutomaticMigrationsAnd finally, you can run:
Add-Migration Initial